The road to winning a deal can often feel like a Sisyphean effort: endless and exhausting. Reaching the onboarding stage can be satisfying, but the real work is only just beginning.
In this guide, you’ll learn a clear 8-step onboarding process from collecting logins and brand files the right way to setting up project dashboards, automating weekly reports, and mapping who handles what.
TL;DR: 8-Step Client Onboarding Process for Marketing Agencies
- Onboarding is how you set the tone, build trust, and keep clients sticking around long after the first month.
- Why onboarding matters:
- It helps clients feel looked after from day one.
- It clears up who’s doing what, by when.
- It stops projects from stalling or derailing later.
- And it saves your team from chasing things that should’ve been sorted up front.
- The 8 steps at a glance:
- Welcome + Contract: Get the paperwork done and send a proper intro email that sets expectations.
- Questionnaire or Discovery: Ask the right questions to understand their goals, audience, and pain points.
- Get Access & Assets: Don’t start anything until you’ve got every login and file you need.
- Kickoff Call: Walk them through what’s happening when, and who’s doing what.
- Lock in KPIs: Get agreement on how success will be measured so there’s no confusion down the track.
- Set Up Tools & Channels: Create their folders, dashboards, and decide how you’ll communicate: Slack, email, whatever suits.
- Internal Team Sync: Get your delivery team across the brief and assign responsibilities properly.
- Deliver a Quick Win + Book Check-ins: Ship something early to show progress and lock in regular updates.
- Quick checklist summary:
- Before onboarding: contracts signed, invoice paid, welcome pack sent.
- During: kickoff done, access sorted, team briefed, timeline agreed.
- After: first deliverable sent, check-ins scheduled, feedback collected.
- Check out our checklist.
- If you’re scaling…
- Using a platform like Synup OS helps automate emails, track tasks, centralize files, and make sure every client gets the same clean experience, whether you’re onboarding your third client or thirtieth.
Why an ACTUAL Structured Onboarding Process Is Crucial
When agencies lose clients early, it’s usually not because the work is bad. It’s mostly because the first few weeks were disorganized.
It could be poor communication. Maybe no one knew who was doing what. It could be due to misaligned expectations or a lack of relationship building.
That’s why the onboarding process is quite important. It builds order before the chaos starts and makes your client feel looked after.
Here are more reasons an early onboarding can change everything:
1. Improves Client Satisfaction
When a client signs a new contract, they’re nervous as hell. They’ve wired money, handed over their brand logins, and are crossing fingers you’re not another agency that delivers slop or just ghosts after kickoff. Really, your onboarding is a trailer for what it’s like to work with you.
That first week is where most trust is built or broken. They want proof they made the right call. And that proof has to come in early (unfortunately, the first impression really is the last in this matter).
A proper onboarding process is a structure that takes the pressure off both sides. It gives the client something solid to hold on to and a chance for both parties to relax and play their part.
2. Sets Clear Expectations
It’s not that teams are unmotivated or that the plan is bad. Most setbacks happen simply because the basics weren’t spelled out from day one.
The logo probably didn’t arrive. Maybe Google Tag Manager access came in on day ten. Or the client thought the ad copy was “included.”
In short, the scope was never written clearly. When you onboard properly, those gaps close fast.
- You list exactly what you need from the client.
- You create shared folders.
- You use one channel for communication (Slack, Notion, or even WhatsApp for small teams).
- You agree on how and when updates will happen.
- You need clear agreements that stop people from working in circles.
We’ve seen small agencies double their delivery speed simply by running a 30-minute onboarding call where they tick off every requirement before starting. It’s not the call that helps, but the discipline and clarity.
3. Clients Stay Longer
Retention often comes down to memory. Clients remember how you made them feel at the very start. If their first experience feels organized, clear, and respectful, they are more likely to stay even when small issues come up later.
Good onboarding makes a big difference. It can increase customer retention by up to 50%. And that matters. A Bain & Company study found that increasing client retention by just 5% can raise profits by as much as 95%. Onboarding plays a direct part in that. When clients see structure early on, they trust you to manage growth later.
4. It Saves Everyone’s Time
Every missing password, unclear task, or even briefs that lacked detail burns team hours. And of course, these add up. Sometimes, it takes several working days to get things back on track.
A structured onboarding fixes that by collecting everything up front.
Before your first strategy call, you already have:
- Website and analytics access
- Brand guidelines
- Target audience info
- Past campaign reports
This means your first week isn’t wasted on failure to sign in or trying to guess tone of voice. You can start producing already.
The 8-Step Client Onboarding Process
Again, the hardest part isn’t landing a client, but retaining them. What truly matters is what happens right after the contract is signed.
This guide walks you through a proven onboarding process for marketing agencies, helping you create a structured, trustworthy experience for your clients. It also includes a practical client onboarding checklist, covering every step from the first welcome email to the first measurable campaign results.
Step 1: Welcome and Contract Signing
If the first three months are important, the first 24 hours after closing a client are crucial. You need to start setting the tone for the relationship.
So, start with a personal welcome email. You don’t need a cold template yet. Reaffirm what you promised in the proposal, explain what happens next, and introduce your main contact. Something simple like:
“Hey Jamie, welcome aboard! Excited to start working together. Here’s what happens next, who’s on your team, and where we’ll share files.”
Attach three things:
- Service agreement: confirms the exact scope and terms.
- NDA: protects both sides from sharing private data.
- First invoice or retainer: confirms commitment before work begins.
Don’t start a single task until both the agreement and payment are confirmed. It’s not about red tape. If you skip this step, you’re leaving room for delayed payments or scope disputes later.
Practical tip: Use tools like DocuSign, HelloSign, or PandaDoc to speed things up. 44% of electronic agreements are signed within 15 minutes.
If you want to look extra professional, attach a short one-pager that details:
- What will happen this week
- When their kickoff call is scheduled
- Who their main contact person is
That small detail alone instantly builds confidence. The client feels they made the right call, not because of what you promised, but because of how smooth you started.
Step 2: Send the Client Onboarding Questionnaire
Before your kickoff call, send a focused onboarding questionnaire to learn about the client’s business, audience, tone, and past marketing results.
A lot of agencies either send a massive 40-question form or forget to send one at all. Both waste time.
A good client onboarding questionnaire should be short, clear, and smart enough to adjust to the kind of business you’re working with.
Keep it between 10–15 key questions. Shorter forms get more completions. So, cut the fluff. Here’s how to make it work:
Use conditional logic. Don’t make everyone fill the same form. For example:
If they’re a local service business, ask:
• “How many branches or service areas do you have?”
• “What’s your Google Business Profile link?”
• “What’s your average lead cost or booking rate?”
Tools like Typeform, ClickUp Forms, or Notion databases make this easy, as you don’t need any code. You can set up rules so questions appear only when relevant.
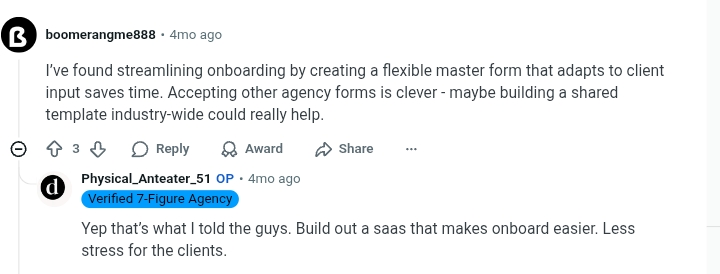
One small-agency owner shared how they built a “smart intake form” in ClickUp. It adapts to answers, accepts other agency forms if clients already have one, and saves nearly two hours per client. That’s the time they now spend on strategy instead of basic info.
Pro tip: Always add examples inside your form. When you ask about “target audience,” include a sample answer like:
“Example: Women 25–40, working professionals, buy 2–3 times a month, mostly from Instagram ads.”
It gives clients a reference so they don’t send vague answers like “everyone.”
Also, end the form with practical next steps and a deadline of sorts:
“We’d love to receive your response within 5 working days. Once you submit, you’ll get a summary email, and we’ll book your kickoff call within 48 hours.”
All these show you’re organized, not guessing what they do but collecting real info that helps your team plan faster. And when a client sees a form that fits their business, it immediately tells them they picked the right agency.
Step 3: Collect All Necessary Access and Assets
This is where most projects lose their rhythm before they even begin. You can have the best kickoff call in the world, but if you don’t have access to the client’s core platforms within the first few days, your team is stuck waiting, and clients start wondering why nothing’s moving.
That’s why the moment the onboarding form lands, your next step is to request platform access and gather brand files immediately. Not next week. Not when “the team gets to it.” Right now!
1. Get Full Access to the Website or CMS
Start by identifying which platform the client’s site is built on. WordPress, Google Business Profile, Social Media Pages… Each one needs different access.
Practical Tip: Always include exact instructions and screenshots if possible. Clients often get stuck here, and a few clear steps save you both time.
2. Connect to Their Analytics and Tracking Tools
You need access to three specific tools to audit performance and track campaign ROI properly. Without these, you’re operating blind.
Here’s how to request them:
- Google Analytics 4 (GA4): Ask for Editor access via your agency Gmail address. This gives you access to create audiences, view reports, and build explorations.
- Google Tag Manager: Request Admin or Publish access to your client’s digital assets. This level of access allows you to set up and manage essential tracking tools such as the Meta Pixel, LinkedIn Insight Tag, or other conversion tracking codes (small pieces of code that track visitor actions and measure ad performance) that help measure campaign performance and optimize results.
- Google Search Console: Share your Gmail and ask the client to add you as a Full User in Settings > Users & Permissions. This allows your SEO team to monitor indexing issues, crawl errors, and Core Web Vitals.
Don’t wait for these. Make access a checklist item with follow-ups scheduled every 48 hours until it’s done.
3. Set Up Paid Media and Ad Account Permissions
If your team is handling paid advertising, this is non-negotiable. You need admin-level access to campaign platforms to audit past spend, set budgets, and adjust creative.
Here’s all you need to do:
- Google Ads: Send your MCC ID and ask the client to grant Admin or Standard access to your manager account. This connects their account to yours for full oversight.
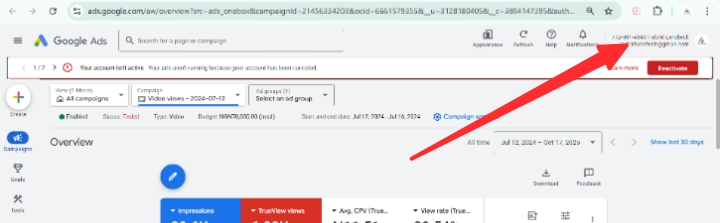
Source: Google Ads
- Meta Business Manager (Facebook & Instagram): Have the client add you via Business Settings > Partners. Share your Business Manager ID and request Ad Account Admin and Page Admin roles.
Reminder: Always double-check permission levels. “Analyst” access won’t let you edit anything and will delay your work.
4. Add Social Media Permissions for Organic or Paid
Whether you’re managing content, engagement, or paid social, you’ll need access to their business pages on each platform.
Instead of asking for logins, guide them to assign roles:
- Facebook Page: Request Admin or Editor via Meta Business Suite. Avoid “Page roles” under Facebook’s old settings. It’s being phased out.
- Instagram: Must be connected through Facebook Page. Confirm connection under Linked Accounts.
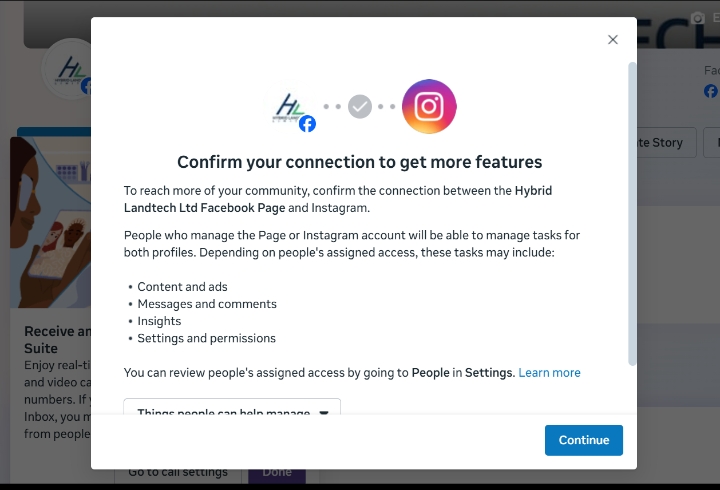
Source: Facebook/Meta Business Suite
- LinkedIn Page: Ask the page owner to assign you as a Content Admin or Super Admin.
- YouTube: Have the client go to YouTube Studio > Settings > Permissions and send an invite to your agency’s Google account.
Give them direct links and step-by-step instructions. Don’t leave it vague. This step alone often takes 3–4 days without guidance.
5. Gather All Brand Assets in One Place
You also need their full brand kit before your creative or content team touches a thing. This includes:
- Logos in SVG and PNG, including full-color, mono, and reversed versions
- Brand fonts and any commercial use licenses
- Color palette in HEX and CMYK codes
- Latest brand guidelines or style guide (PDF format preferred)
- Sample social media posts, blog content, or campaign materials
- Any “do not use” phrases, visuals, or compliance red flags
Here’s how to collect it:
Set up a Google Drive folder with subfolders labeled:
/Brand Assets
/Logos
/Fonts
/Visuals
/Style Guide
/Previous Campaigns
Name files clearly, like BrandName_Logo_White.svg or BrandName_Font_Primary.otf.
6. Stay on Top of It With a Live Access Tracker
Instead of sending dozens of emails and trying to remember who has what, build a live Access Tracker that your whole team can see.
Use Google Sheets, Notion, or ClickUp. Here’s a simple structure:
Assign a team member to update this daily during onboarding. Add it to your main client dashboard.
7. Use Secure, Password-Free Tools
Never ask clients to email passwords. It’s bad practice, and it puts your agency at risk.

If you absolutely must store credentials (for example, CMS login), use encrypted password managers like Bitwarden, 1Password, or Google Workspace Vault with admin-only access.
8. What “Done” Looks Like
By the time this step is complete:
- Every person on your team can access the tools they need without asking
- All brand assets are properly named and sorted in a shared folder
Skipping this step, or rushing it, costs you money. Agencies that don’t collect full access early often lose 3 to 5 working days just waiting for someone to send “the right login.” And when the client starts chasing you for progress, it’s already too late.
Get ahead. Make this process airtight. And make it repeatable.
Step 4: Conduct a Kickoff Meeting
Now comes your client kickoff, where relationships become real. This 30–45-minute meeting shapes the tone for the rest of the project.
Who should attend:
- Client decision-maker (usually marketing lead or founder)
- Your project manager
- Channel specialists (SEO, Ads, Content)
Agenda to follow:
- Revisit goals and KPIs from the onboarding questionnaire.
- Clarify roles and responsibilities (who approves what).
- Outline timelines, deliverables, and reporting cadence.
- Address potential roadblocks early.
Record the session, upload it to the shared drive, and send a recap email with key decisions. That single action eliminates confusion later when people forget what was agreed upon.
Step 5: Define Success Metrics and KPIs
Without measurable targets, projects drift. During onboarding, convert client goals into specific KPIs.
Examples:
- “Increase website conversions by 20% within 90 days.”
- “Grow monthly organic traffic by 30% by Q2.”
- “Reduce CPL to under $50.”
Tie every KPI to a deliverable, timeline, and owner. It protects both sides: you from scope creep, and the client from false expectations.
Pro Tip: Review these KPIs again during the first reporting call. It reminds everyone what “success” actually looks like.
Learn More: 11 Most Important Marketing Agency KPIs to Track Every Month
Step 6: Set Up Accounts and Centralize Communication
Use one central workspace for everything and stick with it.
Here’s a simple setup flow:
- Create a Slack channel (or group chat) per client.
- Set up shared Google Drive folders for assets, invoices, and reports.
- Create a dashboard for weekly metrics and deadlines.
- Store all links in one pinned doc inside the workspace.
Platforms like Synup OS can centralize even more, from location data and reputation tracking to social publishing and review management (more on this later).
Pro Tip: Set communication practices early; for example, “We use Slack for daily updates, Drive for assets, and monthly calls for strategy reviews.” No one should have to guess where a file or message lives.
Step 7: Align Your Internal Team
Right after the kickoff call, huddle with your team. Internal misalignment can ruin delivery speed more than client issues ever do.
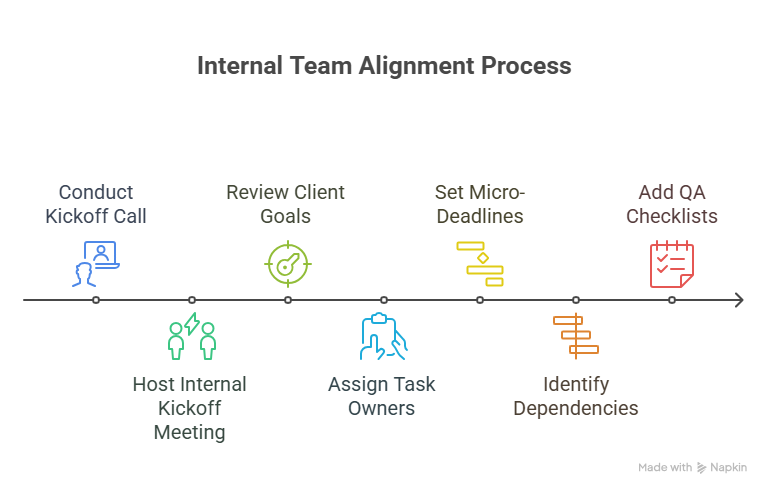
Host a 15-minute internal kickoff to:
- Review client goals, tone, and expectations.
- Assign task owners and set micro-deadlines.
- Identify dependencies (e.g., copy before design).
- Add QA checklists for every deliverable.
Visual tools can help here. Gantt views or task swimlanes make dependencies clear.
Step 8: Deliver a Quick Win and Schedule Follow-Ups
End onboarding with momentum and not silence. Clients start evaluating you in the first ten days, so give them something tangible fast.
Examples of “quick wins”:
- A mini SEO audit with 3–5 high-impact fixes.
- An ad account cleanup that improves performance instantly.
- A content calendar preview for the next two weeks.
When clients see action early, they relax and start trusting your process.
Pro Tip: Send a short Loom video summarizing what’s done, what’s next, and what’s pending from the client. It humanizes your communication and shows progress without a formal meeting.
Client Onboarding Checklist
Let’s sum it up! Every agency needs a client onboarding checklist that doesn’t rely on memory or mood. Below is a simple, easy-to-follow system that breaks onboarding into three phases:
- Pre-Onboarding: Sets the foundation before delivery starts
- During Onboarding: Builds trust and clarity
- Post-Onboarding: Prepares your team and client for long-term success
Free Checklist: Use this Google Sheet checklist template
Customize it to make it yours, and you can get to work.
Pre-Onboarding
Before your team starts, lock in the basics:
- Contract signed and first invoice paid
Avoid chasing clients down for signatures or money. Confirm both in writing before scheduling the kickoff. - Client welcome packet sent
This should be a single PDF, Notion doc, or email. Include:- Primary contact and project lead
- Timeline overview (e.g., Phase 1: Audit, Phase 2: Content, etc.)
- Tools you’ll be using (Trello, Slack, Notion, Synup OS)
- Response expectations (e.g., 48-hour reply window)
- Access request checklist shared
Send a clear list of what’s needed:- Google Analytics and Google Tag Manager
- Meta Business Manager access
- Website CMS credentials
- CRM, booking, or form tools
- Brand files (logos, style guides, etc.)
Make it easy with a Google Form or shared doc.
During Onboarding
This is where the real setup happens. Don’t skip any of these steps.
- Kickoff call scheduled and agenda confirmed
Hold this call within a few days of payment. Your agenda should include:- Introductions and roles
- Overview of goals
- Access review and missing logins
- Review of deliverables and timelines
- Approval and feedback process
Send the agenda ahead of time. Take notes. Recap by email.
- Onboarding questionnaire completed
Don’t assume you know the client’s business. Ask them:- What are your top 3 priorities?
- Who’s your ideal customer?
- What marketing channels have worked before?
- What does a qualified lead look like to you?
- What tools are you using in-house?
Capture this in a live call or form. Keep it short. Aim for 10–15 essential questions.
- Logins confirmed and working
Test every login. Log in to each platform. If anything’s missing, escalate it now.
Avoid handing deliverables to your team without access. It leads to rework and lost time.
- Team assigned and project loaded
Set up the account inside your PM tool (Trello, Synup, ClickUp, Asana, etc). Assign roles:
- Account manager
- Strategist
- Content lead
- Designer
- Media buyer
Name the workspace clearly. Add all client documents and the onboarding checklist to the shared folder or board.
Post-Onboarding
This part makes or breaks your momentum.
- First deliverable or audit sent
Every client wants to know they didn’t just pay for silence.
Send a first asset within 7–10 business days. Could be:
- SEO: baseline audit with quick wins
- Ads: account structure teardown
- Content: editorial calendar or draft
- Branding: moodboard or tone guide
It doesn’t have to be perfect. You just need to show motion.
- Regular meeting cadence set
Choose a rhythm that fits the client’s size and urgency. For example:
- Small retainers: fortnightly update emails
- Mid-tier clients: biweekly Zooms
- Bigger brands: weekly meetings and monthly reports
Put it in the calendar. Share standing Zoom links. Don’t leave it informal.
- Onboarding feedback form sent
Keep this tight. 3–4 questions max:- Was the onboarding clear and professional?
- What felt slow or confusing?
- Is there anything we should do differently?
Use this input to tighten your process over time.
The Benefits of Using a Client Management Platform
You can do all of this manually. But once you hit 3–5 clients per month, things may start to fall apart.
It’s natural. People forget logins. You send the same welcome email three times. Your team is digging through Slack trying to find the questionnaire response. And your client’s already wondering if they hired amateurs.
That’s what a centralized platform like Synup OS helps you fix. And here’s why your marketing agency onboarding process should live inside a platform:
1. You Stop Doing the Same Things Over Again
Think about how many emails go out when a new client signs up:
- The welcome note
- The onboarding form
- The “here’s what we need access to” list
- The kickoff call scheduler
- The “just checking if you’ve filled the form” nudge
Now multiply that by 5 clients in a month.
If you’re still doing all that by hand (copying and pasting from old threads, chasing logins on WhatsApp), you’re losing entire workdays. That’s time you could’ve spent building a strategy, fixing broken funnels, or actually helping the client grow.
A client management platform lets you set all that up once, and then press go.
Once the client signs, you can set up the following process, thanks to its task and activity management features:
- Email gets sent
- Folder is created
- Onboarding checklist goes live
- Your team gets tagged
- Client gets a nudge if they don’t fill out the form.
2. No More Scattered Notes or Lost Messages
We’ve all lost a file or message somewhere.
One second you’re looking for the brand logo, next thing you’re ten minutes deep in Gmail, typing “logo v3 final (1).png” and praying it shows up.
That’s not how a real business should run.
When everything lives in one shared space (the docs, logins, call notes, content calendar), no one’s wasting time asking, “Who has that again?” or “Did we already get that approval?”
Every team member gets a detailed view of their tasks and activities.
And better yet, your client also knows where to find everything. They can log in, see what’s done, what’s next, and what’s pending from their side.
Every agency knows how essential client reporting is. If you run SEO for a client, they need an accurate overview of a number of metrics that you absolutely cannot spend time gathering every time.
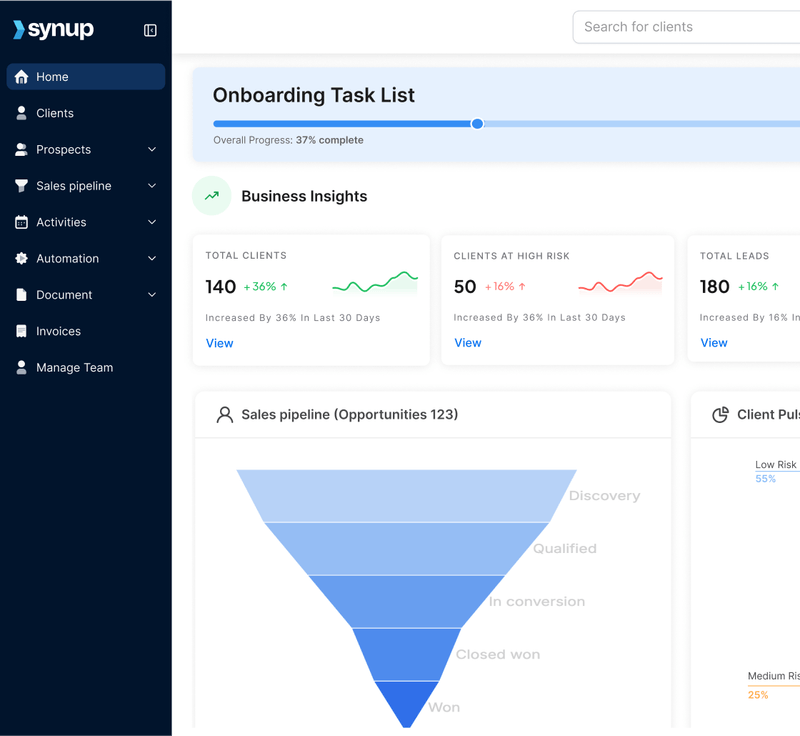
Synup OS brings all your clients’ channels (such as Google Business Profiles, social media accounts, and review platforms) into a single, unified dashboard. This dashboard can be fully white-labelled, allowing your clients to access real-time data and insights about their marketing performance anytime they want, all under your agency’s branding.

It also lets you export branded, shareable reports, so you can showcase results clearly and highlight your wins.
3. You Build a System That Works
A lot of agencies fall apart because of inconsistent systems.
One week you’re on top of things, and the next week, you’re scrambling because you forgot to book the kickoff call, your team didn’t know what to deliver, and the client’s asking where their login email is.
This is what a good platform fixes.
Every new client project kicks off the same flow:
- Load the onboarding checklist
- Assign team members based on the service type
- Add the timelines for each stage
- Set auto-reminders for you and the client
Synup OS was built exactly for this. You don’t need to be a big SaaS agency or enterprise monster to need structure. Even if you’re a lean 3-person shop, a proper setup keeps you sharp.
Common Pitfalls to Avoid
Even with the best tools, many agencies still encounter issues during onboarding.
Let’s call it what it is. Here’s the stuff that catches people out and how you fix it.
Problem 1: Client Ghosts After They Pay
You’ve sent the invoice. It’s paid. Then, a long silence.
- You’re sitting there wondering:
- “Do I follow up again?”
- “Did they change their mind?”
- “Are they expecting me to start, or are they meant to send stuff first?”
What to do instead:
Set the rules from day one. Right after payment, send them a message like:
“Hey [Name], to kick off the project, we’ll need the onboarding form and all logins back by Friday. Once that’s in, we’ll lock in your start date for Monday.”
It’s respectful, clear, and shows you’ve got a system. If they’re late, they miss their slot. That’s fair.
Problem 2: Logins Take Forever to Arrive
You’re ready to work, but still waiting on basic stuff like Analytics access or CMS logins.
You nudge once. You nudge again. And now it’s three days wasted.
What to do instead:
Use a checklist (Google Doc, Typeform, Synup OS, whatever suits) that lists:
- Exactly what platforms you need
- What level of access (Admin, Editor, Viewer)
- Which email to grant it to
Make it a live link, share it, and don’t start work until it’s 100% done.
Problem 3: Sales Sells the Dream, Delivery Gets a Mess
Sales said: “We’ll bring you 50 leads this month!”
Delivery logs in and finds no offer, no funnel, no strategy.
What to do instead:
After every sale, fill out a quick internal handover doc:
- What was promised?
- When is the project starting?
- What deliverables were included?
- What red flags came up in the sales convo?
That way, your delivery team isn’t walking in blind. It’s not hard. It just needs to be a habit.
Frequently Asked Questions
1. How long should onboarding take?
You should be wrapping up onboarding in 5 to 7 business days tops if it’s a smaller client (solo operator, franchise unit, or a local service biz). That gives you time to collect logins, run your kickoff, and get the first piece of work out the door. For bigger setups or enterprise deals, give it 2 to 3 weeks, max. Anything longer than that and the energy drops, the client starts wondering if you’ve disappeared, and your team loses the rhythm.
2. Can onboarding be automated?
Yep, and it should be. You can set up welcome emails, login request forms, and even nudge reminders if a client hasn’t sent their stuff yet. Platforms like Synup OS let you load templates, trigger tasks, and get your team moving without playing email tag all week. Doesn’t matter if you’re a two-person crew or a team of 15. Having a repeatable setup saves you hours and keeps things going with less manual efforts.
Final Words
Don’t overcomplicate it. But don’t freestyle onboarding either.
If you’re serious about delivering great work, keeping clients happy, and not burning your team out, get your onboarding process into a proper system.
Use a platform, build templates, set rules, and stick to them.
Because when you get onboarding right, the rest of the project runs smoother. Your team stays sane. Your clients stay longer. And that’s what builds a real agency.
Use the checklist provided, make it your own, and turn onboarding into a strength. If you’ve got more than five clients, then you should by all means use a client management platform like Synup OS. You don’t have to subscribe right away. You can see what it looks like in there with a quick demo first.